| | 
- The subfloor you are planning to put the flooring down on should be flat and free of dirt and debris. The subfloor should be a minimum of ½” thick.
- Wood flooring needs time to adjust to conditions in the room where it is to be installed, so it’s important to plan well ahead. If the new floor is being put into a new house or addition, have all of the doors and windows in place before the flooring is delivered. We recommend that the flooring be stored in the area it will be put down in for at least one week prior to installation. While storing the material, sticks should be placed between each layer so that each plank is exposed to its new environment. The temperature and humidity levels should be close to what will be lived in.
- The first row of flooring should be face nailed next to the most important wall in the room. Leave a minimum of ½” between the first row of flooring and the wall. This will allow room for expansion of the floor.
- Snap lines should be put down on the subfloor to use as reference points and to make sure you are staying parallel to the main starting row of flooring.
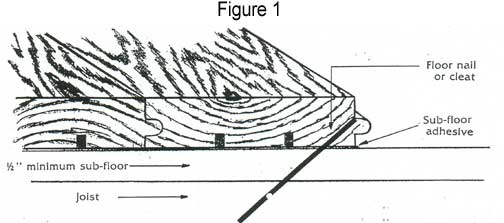
- Use a power nailer to nail through the tongue (Fig. #1). If a flooring nailer is not used, predrill the holes so as not to split the flooring. In addition to nailing, adhesive glue can be used which greatly reduces the chances of squeaks in the floor.
- When end butting our flooring, it is necessary to square ends. While laying the floor, make sure that splices do not line up with one another. This will weaken the floor and it will not give an acceptable appearance.
- If the floor is to be screwed down, then the floor must be drilled and counter bored to accept plugs which will hide the screw heads. When putting the plugs in, put a couple dabs of glue on the plug to hold it in place. Plugs should be used on wide flooring to keep it from cupping.
- When the flooring has to be straightened, it is best to use one of these methods as illustrated in Fig. #2 and #3.

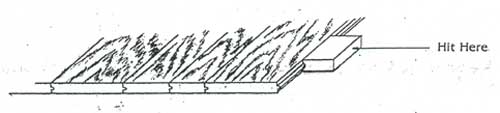
Also, as you place each row down, it is recommended that each plank be given a sharp rap with a hammer on the leading edge as shown to make a tight fit. Use a scrap piece of flooring to protect the plank as shown in Fig. #4.
- When you have reached the last few rows of flooring, you’ll find it difficult to toenail, so face nailing will be required. Remember to leave ½” expansion space between the flooring and all walls.
- After the floor has been put down, it is necessary to sand the floor to remove any planer marks and to remove any uneven shoulder heights.
CustomCut Millwork also has the capabilities to produce hardwood mouldings and stair parts to compliment your new hardwood floor.
|
|